How To Create a No.4 Stainless Steel Finish
How To Match a No. 4 Finish
No. 4 Finish is the most popular for appliances, the food and beverage industry, elevators, escalators, hospitals, and any work area where there is food contact. It is characterized by short, parallel polishing lines and is the easiest of the stainless finishes to maintain. Depending on the requirements of the application, the final finish can be anywhere between 120 and 320 grit. (Higher grit numbers produce finer polishing lines and more reflective finishes.) The surface roughness is typically Ra 25 micro-inches or less.


Recommended Steps for Creating or Blending a #4 Finish on Stainless Steel
Step 1
LEVELING THE WELD
Choose One:


Tip:
- Start with 60 grit & use 7″ grinder if possible. (The grind lines from 7″ diameter discs are easier to blend than small radius grind lines left by 4-1/2 or 5″ diameter discs.)
- Align the grind line scratches with the grain line direction. (Perpendicular scratches are more difficult to blend while parallel scratches are easier to blend.)
- Stay as close as possible to the weld area to minimize the time spent on final blending, leaving a thickness of 0.5 to 1 mm to avoid cupping the sides of the weld.
Step 2
SETTING THE GRAIN
(to remove circular grind lines from Step #1)
Choose One:
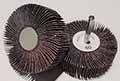
FLAP WHEEL
Premium AO Mtd. Flap Wheel (3 x 1 x 1/4 60 grit #11390)
Note: This step sets the initial scratch using either a flap wheel or a coated abrasive belt between 60-120 grit, depending on the existing finish. Belts attached to an inflatable or expandable drum will create a deeper scratch than the flap wheel, but either will work.
Tip:
- The tool should be operated at around 3500-4500 RPM, with only about 5-10% more pressure than the weight of the tool to allow the abrasive to work best. The variation of RPM also allows the operator to dial in the scratch to better match the manufactured finish.
- It is best to move the tool in an elliptical motion rather than straight back and forth to avoid noticeable finishing lines. By moving the tool in this manner, the operator also cuts the linear finishing lines to match the shorter polishing lines made by the producer.
Step 3
FINAL FINISHING
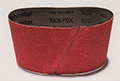
SURFACE CONDITIONING BELT
(3-1/2 x 15-1/2″ A-Med #53789)
Note: mount on inflatable rubber sanding drum. Available from other sources (we recommend Dynabrade #94472 – 5″ dia. x 3-1/2″ wide)
This step will soften and blend the finish to match the existing finish. Note that RPM is more critical at this point. The higher the RPM, the more reflective the finish; the lower the RPM, the more distinct the finish. The finisher should use only a slight increase in pressure above the weight of the tool to allow for a smooth, uniform match to the factory finish.

Tip:
- Start with 60 grit & use 7″ grinder if possible. (The grind lines from 7″ diameter discs are easier to blend than small radius grind lines left by 4-1/2 or 5″ diameter discs.)
- Align the grind line scratches with the grain line direction. (Perpendicular scratches are more difficult to blend while parallel scratches are easier to blend.)
- Stay as close as possible to the weld area to minimize the time spent on final blending, leaving a thickness of 0.5 to 1 mm to avoid cupping the sides of the weld.
Step 4
FINAL BLENDING / TOUCH-UP
HAND PAD
Black Flex-N-Finish Hand Pad (6 x 9 #07446)

Tip:
- Use these flexible hand pads with a sanding block for final blending and touch-up.